Let me be upfront about something: I don't write code.
I can barely format a spreadsheet without Googling something. I've tried to "learn to code" about four times in my life and given up every single time. I run a small service business, and for the longest time, I assumed anything with the word "AI" in it was firmly in the developer's territory — not mine.
So when I heard people talking about building AI chatbots for their websites, I assumed they meant months of work, a hired developer, and a budget I didn't have.
Then I tried Monology.
Forty-five minutes later, I had a working AI chatbot on my website. It greeted visitors, figured out whether they were potential clients or job applicants, collected their contact details through a form, and sent me a Slack message with a summary. All of it. Automatically.
I'm going to walk you through exactly how I did it — every click, every setting, every decision. If you can use Canva or build a slide deck, you can build this.
What I Built (And What It Actually Does)
Before we get into the how, let me show you what the finished chatbot does — so you know what you're working toward.
When someone visits my website and opens the chat:
- They get a greeting from the chatbot explaining what it can help with
- An AI agent figures out what they actually want — are they a potential client, a job seeker, or just have a general question?
- Based on that, they're routed down a different path — clients go to a lead capture form, applicants see a friendly message with next steps
- If they fill the form, they get a confirmation message and I get a Slack notification with all their details
That's it. It sounds complicated written out like that, but the whole thing is six nodes connected together on a visual canvas. No code involved. Not a single line.
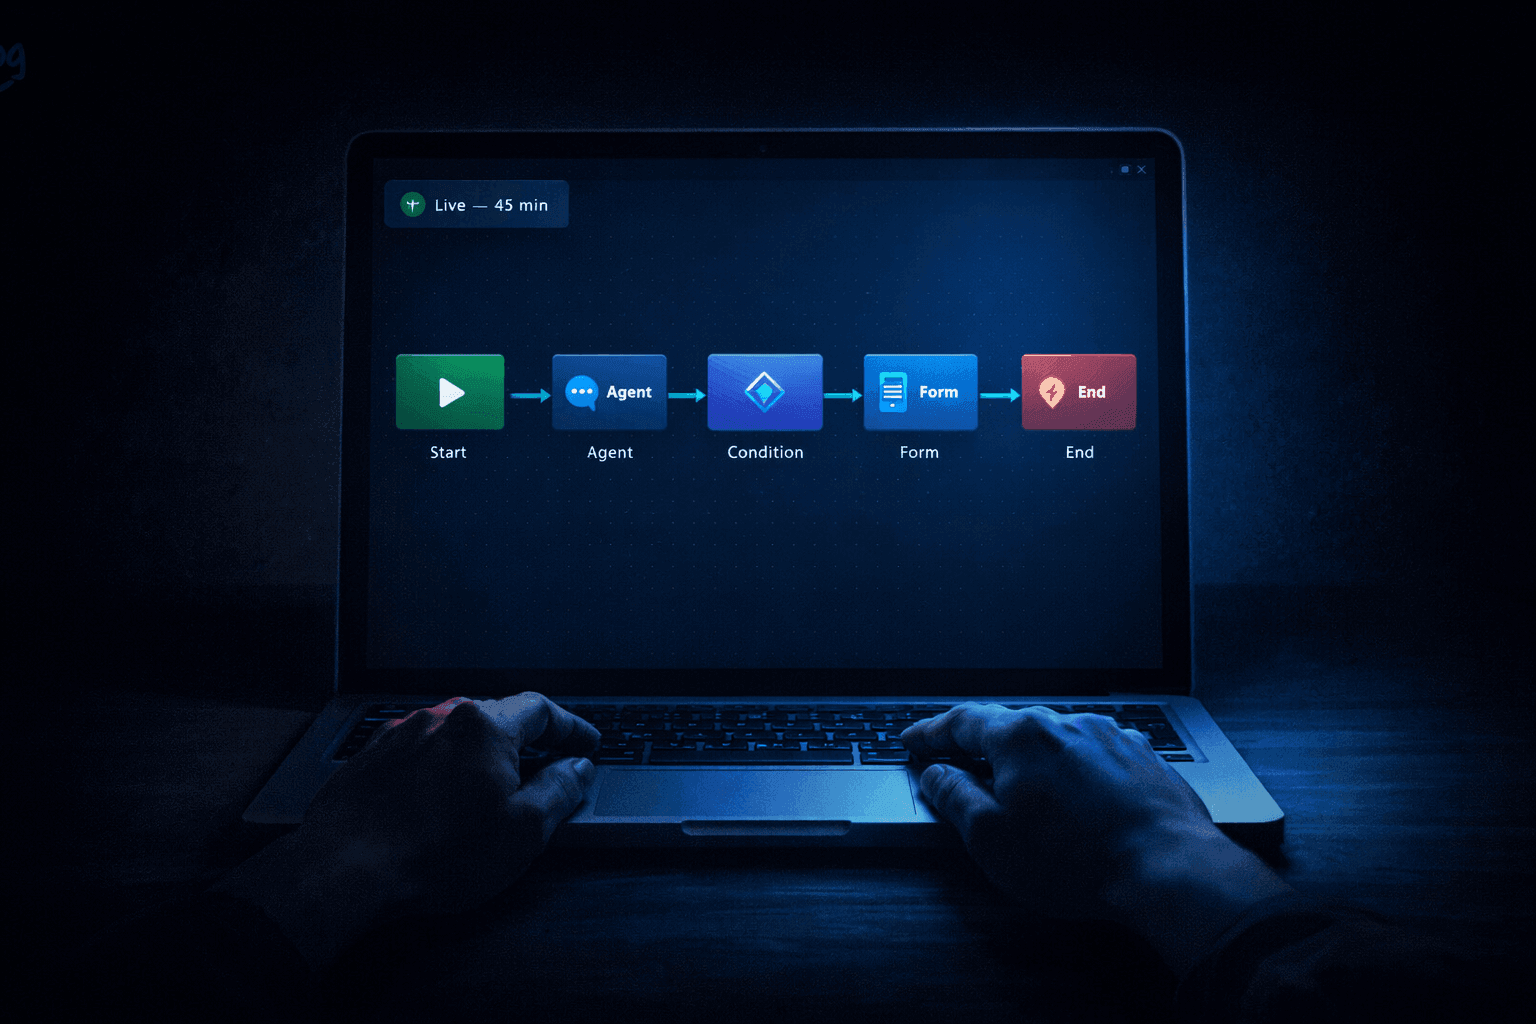
Here's the workflow I built, in plain English:
Start Node → Agent Node (intent detection) → Condition Node (client or applicant?) → Form Node (lead capture) → Action Node (Slack notification) → End Node
Let me walk you through each step.
Step 0: Sign Up and Get Oriented (5 minutes)
Go to monology.io and start your free 11-day trial. No credit card needed.
Once you're in the dashboard, you'll see the left sidebar has a section called Studio. This is where everything lives:
- Workflows — where you build the logic of your chatbot
- Widgets — the chat interface your visitors actually see
- Forms — the forms you can embed inside conversations
- Conversations — where all recorded chats are stored
There's one thing you need before you start building: an OpenAI API key. This is what powers the AI in your chatbot. Go to platform.openai.com, create a free account, generate an API key, and copy it somewhere. You'll need it in about five minutes.
Time so far: 5 minutes
Step 1: Create Your Workflow (2 minutes)
In the Studio sidebar, click Workflows, then click Create Workflow.
Give it a name. I called mine "Website Lead Qualifier" — something descriptive so I'd remember what it does later.
You'll land on a visual canvas. This is Monology's workflow builder — the drag-and-drop interface where you'll build everything. Right away, you'll see two nodes already placed on the canvas and connected by an arrow:
- A green Start Node on the left — this is where every conversation begins
- A red End Node on the right — this is where conversations finish
Everything you build goes between these two. You add nodes by clicking the + button that appears on the connecting arrow between any two nodes.
That's the whole interface. Seriously. You click +, choose a node type, configure it, and move on.
Time so far: 7 minutes
Step 2: Configure the Start Node (3 minutes)
Click on the Start Node to open its settings panel on the right side.
You'll see two options:
- Auto Reply — toggle this ON. This tells the chatbot to immediately send an opening message when someone starts a conversation, rather than waiting for the visitor to type first.
- Instructions / Greeting Message — this is a system prompt, not a message the visitor types. Think of it as a private instruction you give the AI: "When this conversation starts, greet the user like this." The AI reads it and generates the greeting in its own words.
Write your instruction here. You're not writing the exact message the visitor will see word-for-word — you're telling the AI what kind of greeting to produce. Here's what I wrote:
"Greet the user warmly and in a friendly, human tone. Let them know you can help with service inquiries, general questions, or job opportunities. Ask them what brings them here today. Keep it to two sentences maximum."
The AI takes that instruction and produces a natural greeting when the chat opens. This means the greeting feels conversational rather than robotic — because the AI is generating it, not just displaying a fixed string of text.
That's it for the Start Node. One toggle, one instruction box. Done.
Time so far: 10 minutes
Step 3: Add an Agent Node for Intent Detection (10 minutes)
This is the most important node in the whole workflow. The Agent Node is where the AI lives — it reads what your visitor says and figures out what they want.
Click the + button on the arrow between Start and End nodes. Select Agent Node from the menu.
A new node appears on the canvas. Click it to open the settings panel. Here's what you'll configure:
LLM Provider
This is where you connect your OpenAI API key. Click Add Credentials, paste in your OpenAI API key, select your model (I used GPT-4o-mini — it's fast and affordable), and save. Monology validates the key automatically so you'll know right away if something's wrong.
The IT Services Intent Classifier Tool
Here's something that surprised me — and saved me a lot of effort. In the Tools section of the Agent Node, Monology has a built-in tool called the IT Services Intent Classifier.
This is a pre-trained AI model (built on DistilBERT, if that means anything to you) specifically trained to classify visitor intent. You don't need to teach it anything. You just turn it on.
It recognises seven different intents out of the box:
- Requirement Submission (someone wants your services)
- General Query
- Contact Details request
- Feedback Submission
- Appreciation
- Greeting
- Job Application Submission
Toggle the Intent Classifier on. Now your agent doesn't just guess what someone wants — it classifies it with high accuracy, and you can use that classification to make decisions downstream. No prompt-engineering gymnastics required.
System Prompt
The system prompt tells the AI how to behave — its personality, role, and rules. This is the one bit that requires some writing from you, but it's not technical at all. Think of it as writing a job description for your chatbot.
Here's the system prompt I wrote:
"You are a friendly and professional assistant for [My Business Name]. Your job is to understand what the visitor needs and help them take the next step. If they're interested in working with us as a client, help them understand our services and move them toward sharing their contact details. If they're looking for a job, acknowledge their interest warmly and let them know the team will follow up. Keep responses concise — no more than 2-3 sentences. Always be warm and human, never robotic."
A few other toggles worth turning on in the Agent Node:
- Use Markdown — ON. Allows the chatbot to use formatting like bullet points in its replies.
- Read Chat History — ON. Lets the agent remember what was said earlier in the same conversation.
- Add History to Messages — ON. Passes that history into the AI prompt so responses stay contextually relevant.
Response Model
This is a feature that makes the Condition Node (coming next) much easier to set up. In the Response Model section, I added one structured field:
- Field name:
visitor_intent - Type:
string
This tells the Agent Node to extract the classified intent and store it as a named variable called visitor_intent. The Condition Node can then read this variable and make branching decisions. Without this, you'd have to parse the AI's free-text response yourself — much messier.
Save the Agent Node.
Time so far: 20 minutes
Step 4: Build Your Lead Capture Form (5 minutes)
Before adding the Form Node to the workflow, you need to create the actual form. Go to Studio → Forms and click Create Form.
I named mine "Client Enquiry Form" and added four fields:
- Name — Text field, required
- Email — Email field, required
- Company — Text field, optional
- What are you looking for help with? — Text area, required
Monology supports a solid range of field types — text, email, number, phone, file upload, checkbox, dropdown, radio buttons, toggle, and star rating. For a basic lead capture, the four fields above are all you need.
Save the form and go back to your workflow.
Time so far: 25 minutes
Step 5: Add a Condition Node to Route Visitors (5 minutes)
Now for the branching logic. Click the + button after the Agent Node and add a Condition Node.
The Condition Node asks a simple question: is something true or false? Based on the answer, it routes the conversation down two different paths.
Here's the condition I set up:
- Field:
visitor_intent(the variable we defined in the Agent Node's Response Model) - Operator:
equals - Value:
Requirement Submission
This means: if the AI classified the visitor as someone who wants to hire us, send them down the TRUE path. Everyone else — job applicants, general queries — goes down the FALSE path.
On the TRUE path, I added a Form Node (linked to the Client Enquiry Form I just created) followed by an Action Node (Slack notification — more on that next).
On the FALSE path, I added a Static Message Node with a friendly message:
"Thanks for reaching out! Our team will review your message and get back to you within one business day. We appreciate you taking the time to connect with us. 😊"
Both paths then connect to the End Node.
The whole branching structure took about five minutes to set up, including dragging the nodes into a layout that made visual sense.
Time so far: 30 minutes
Step 6: Add an Action Node to Send a Slack Notification (5 minutes)
This is the part that made me feel like a wizard the first time it worked.
After the Form Node on the TRUE path, click + and add an Action Node. Select Send Slack Message as the action type.
You'll need a Slack Webhook URL — go to your Slack workspace settings, create an incoming webhook, and copy the URL. Paste it into the Action Node.
Then write your message. The real power here is dynamic variables — you can pull in data from the form the visitor just filled out. Here's the message template I wrote:
🔔 New lead from your website!

Name: {{form.name}}
Email: {{form.email}}
Company: {{form.company}}
Looking for: {{form.what_are_you_looking_for_help_with}}
Classified intent: {{agent.visitor_intent}}

Follow up within the hour for best results.
The {{form.name}} syntax pulls the value directly from what the visitor typed. When this fires, my Slack gets a perfectly formatted summary of every lead — no manual copy-pasting, no digging through conversation logs.
I also toggled on Continue on Error. This means if Slack is momentarily unavailable, the workflow doesn't break — it just keeps going and the visitor still gets a good experience.
Time so far: 35 minutes
Step 7: Create and Deploy the Widget (10 minutes)
The workflow is the brain. The Widget is the face — it's what visitors actually see on your website.
Here's the part I didn't expect: you don't need to go to Studio → Widgets at all. You can create your widget directly from the workflow builder.
Click on the End Node in your canvas. You'll see an option to create a widget right there — and when you do, it automatically attaches to the current workflow. No manual linking, no switching between sections. The widget is connected the moment you create it.
Appearance Settings
After creating the widget from the End Node, you can customise how it looks:
- Primary colour (I used my brand colour)
- Chat window size
- The launcher button — the little icon in the corner that visitors click to open the chat
- Light or dark theme
- Welcome text shown before the chat opens
No design skills needed — it's all sliders and colour pickers.
Live Preview
Before deploying, use the Live Preview to test your chatbot end-to-end. Send it some test messages. Try "I'm interested in hiring you" and watch it route to the form. Try "I'm looking for a job" and watch it take the other path.
This is where I caught a few things I wanted to tweak — I adjusted the tone of the system prompt and tightened up the Slack message template. Made the changes, hit preview again, all good.
Deploying to Your Website
Once you're happy, grab your embed code from the widget settings. It looks like this:
<script src="https://your-subdomain.monology.io/chat-widget.js"></script>
<script>
  const widget = initMonologyWidget({
    containerId: 'your-widget-id',
    urlId: 'your-widget-id'
  });
</script>
Paste this into the </body> section of your website's HTML. If you're using WordPress, there are plugins that let you add custom scripts without touching code. If you're on Webflow, Squarespace, or Framer, they all have "custom code" sections in the settings where you can paste this directly.
If you don't want to embed it at all right now, Monology also gives you a shareable chat link — a permanent URL that opens the chatbot directly. You can share it in your email signature, social bio, or anywhere else while you figure out the website embedding later.
Total time: 45 minutes
The Full Workflow, Visualised
Here's a bird's eye view of everything I built, mapped out as a flow:
[Start Node]
   Auto Reply ON + AI greeting instruction
         ↓
[Agent Node — Intent Classifier]
   OpenAI GPT-4o-mini
   IT Services Intent Classifier tool ON
   Extracts: visitor_intent
         ↓
[Condition Node]
   visitor_intent = "Requirement Submission"?
         ↓               ↓
      TRUE            FALSE
         ↓               ↓
  [Form Node]    [Static Message Node]
  Client Form    "Thanks for reaching out..."
         ↓               ↓
  [Action Node]       [End Node]
  Slack notification
         ↓
     [End Node]
Six nodes. One workflow. Forty-five minutes.
What Surprised Me Most
A few things genuinely caught me off guard — in a good way.
The Intent Classifier is shockingly accurate. I expected it to struggle with ambiguous messages. I threw edge cases at it — vague openers, oddly phrased questions, messages that could go either way. It got them right almost every time. The fact that it's a dedicated classification model (not just the main LLM guessing) makes a real difference.
The dynamic variables in Action Nodes are incredibly practical. Being able to pull {{form.email}} or {{agent.visitor_intent}} into a Slack message or email template is the kind of feature that sounds minor but completely changes how useful the automation actually is. The Slack messages I get are genuinely ready-to-act-on, not just "someone submitted a form."
The Response Model feature deserves more attention. Most people would skip past it, but telling the Agent Node to extract a structured field like visitor_intent is what makes the Condition Node work cleanly. Without it, you'd be trying to write conditions against messy free-text responses. With it, you have a clean, named variable. It's a small config step that unlocks a lot of power.
Continue on Error is a thoughtful default. Every Action Node has this option. It means if your Slack webhook fails or your email provider has a hiccup, the visitor still gets through the workflow without hitting a broken experience. That's the kind of "I've thought about this" detail that builds trust in a platform.
What I'd Do Differently Next Time
A few lessons from building this that'll save you time:
Create your Form before you start the workflow. The Form Node in the workflow just links to a form you've already created. If you haven't built the form yet, you'll have to pause mid-workflow, go build it, come back, and link it. Build the form first, then build the workflow around it.
Define your Response Model fields early. I nearly forgot to set up the visitor_intent structured output field on the Agent Node. If I'd skipped it, the Condition Node would have had nothing clean to evaluate. Set up your Response Model at the same time you write your system prompt.
Test with messy, real-world inputs. In the Live Preview, don't just type perfectly phrased test messages. Type how real people type — fragments, typos, unclear questions. "Hi" instead of "I'm interested in your services." "Looking for work" instead of "I'd like to apply for a job." The intent classifier handles these well, but testing with realistic inputs builds your confidence before going live.
Use the Static Message Node more. I initially skipped it and relied entirely on the Agent Node for all responses. But Static Message Nodes are perfect for confirmations ("Thanks for filling that out — we'll be in touch!") because they're instant, consistent, and don't consume any LLM tokens. Save your Agent Node for the parts that actually need intelligence.
What This Cost Me
Let me be transparent, because this matters.
Monology has an 11-day free trial. After that, there's a monthly subscription. My OpenAI API costs for the first month running this chatbot on a small business website came to under $4 — because GPT-4o-mini is affordable, and the Intent Classifier tool handles classification separately without burning extra tokens on every message.
Compare that to the alternative: hiring a developer to build something like this from scratch would have cost me several thousand dollars minimum and weeks of back-and-forth. I know, because I got a quote once. The quote was for $6,500 and eight weeks.
I spent 45 minutes and the cost of a Netflix subscription.
Who Should Build This
If you are any of the following, this is for you:
- A freelancer or consultant who's tired of manually qualifying every inquiry
- A small business owner whose contact form is a mix of real leads and noise
- A solopreneur who can't be online 24/7 but doesn't want to miss a lead at 11 PM
- An IT service company dealing with client inquiries and job applications landing in the same inbox
- Anyone who's been told "you need a developer for this" and never quite believed it
You don't need to understand how large language models work. You don't need to know what DistilBERT is (though now you can casually drop it in conversation if you want to sound impressive). You need to know what you want your chatbot to do, and Monology gives you the building blocks to do it.
Your First 45 Minutes, Planned Out
To make this as easy as possible, here's the exact sequence:
- Minutes 0–5: Sign up at monology.io, get your OpenAI API key from platform.openai.com
- Minutes 5–10: Create your workflow, configure the Start Node greeting
- Minutes 10–20: Add and configure the Agent Node — LLM credentials, Intent Classifier tool, system prompt, Response Model field
- Minutes 20–25: Build your lead capture form in Studio → Forms
- Minutes 25–30: Add Condition Node, wire up the TRUE/FALSE paths
- Minutes 30–35: Add Action Node with Slack notification and dynamic variables
- Minutes 35–45: Click End Node → create Widget directly from workflow builder, customise appearance, test in Live Preview, copy embed code and deploy
That's it. Forty-five minutes. No code. No developer. No agency.
Just you, a visual canvas, and a chatbot that works while you're not watching.
Start your free 11-day trial at monology.io — no credit card required.